
Creating Assignments
Set of instructions for delivering your online activity.
Which OWL Test, Who has access, When will it be available to them
Assignment Rosters
How to add students, raters, proctors, results viewers or test administrators to an assignment.
Types of Raters - When placing a Rater on the roster of an assignment, you can choose if they will be a Primary, Secondary and/or Final Rater. There is some variation in the way these roles function according to the processing algorithm you have selected for the assignment. For the most common “standard” processing algorithm, the following behaviors apply.
Primary Rater (default) - These raters have access to the responses placed in the assessment pool as determined by the Blind Assessment Count assignment setting. Or if manually placed there by an OWL Administrator using the Assessment Monitor page.
Secondary Rater - Users placed on the roster as a secondary rater will have access to a percentage of the responses as indicated by the Secondary Blind Assessment % setting.
Final Rater - Click this box if you want any assessments performed by the specific rater you are choosing to be selected as the final assessment when finalizing responses.
NOTE: If a final rater is not chosen, then the standard processing algorithm will dictate that the most recent rating will be selected as the final assessment, regardless of the raters status as a primary or secondary rater.

Class Assigning - For customers who organized their domain into classes, this feature allows you to place all students in a class on the roster of a given assignment.
If a new user is added to the class in the future, they will be added to that assignments roster.
Removing a class from an assignment will NOT automatically remove those students from that assignment’s roster. Once the students are on the roster of an assignment, they must be removed from the assignment roster directly by:
Clicking on the Students Roster of the Assignment
Selecting the student(s) from the left panel using the check box(es)
Clicking on the Add/Remove button
Assignment
Field Definitions

Fields are activated and visible based upon the details of your OWL subscription.
Name - The Assignment Name is the way the Assignment will be referenced within OWL for you and other administrators. A good name will help you locate the Assignment later. Test takers do not see the Name.
Title - The Title is how the test taker identifies the Assignment in their My Current Assignments Page.
Sync ID - Users can create this, or OWL will assign a random one.
Organization - This field is used with the OWL Certificates feature to define thisvariable.
Activity - Choose one of OWL Tests you have created from the down down list.
Target Language - Select one of the languages from the drop down box that your Assignment will assess. OWL Target Language Feature.
UI Localization - Select the language for the OWL User Interface. This is the language for the System Messages, Device Check Instructions, Buttons, etc.
Begins* (local) - Enter the date and time when the assignment will be made available to the student or candidate. Before this date/time the examinee will not see the assignment in their my assignments list page.
Ends* (local) - Enter the date and time when the examinee's access to the assignment will expire.
* The times in these fields refer to the assignment creator's local time. The OWL TMS converts the time to UTC for storage in the database. When an examinee in a different time zone looks at the assignment, they will see the begins and ends times converted to their local time.
Example: If you enter 10:00 AM in New York (EDT), it is stored in the OWL database as 2:00 PM UTC. A Test Taker in Italy would see 4:00 PM (CEST). Therefore, if you want that Italian test taker to start at 10:00 AM there time, then you (working from EDT) need to enter in a start time of 4:00 AM.
Practice - Assignments marked practice will allow students to restart, close and reopen the activity at any time. Do NOT use this option if you are trying to rate the activity or create a permanent record of results.
Class Assign - The class assign function allows you to assign the activity to an already created class. Any student or candidate who has been added to that class will be assigned the activity. Please see FAQ below about removing class assigned students from an assignment’s roster. Creating Classes
Show Instant Test Results - Check to show results immediately to the test taker upon their completion of the activity on the Finish Test tab of OWL Tester. Check this box If you are using Dynamic End of Test Feedback.
Show Instant Item Results - Select this option if you would like the results immediately shown to the test taker upon their completion of each individual item/question. The score will appear in the upper right corner of OWL Tester, and a green check or red x will show on each item tab.
Allow Examinee to Resume - If this option is selected, the test taker can resume the Activity as often as they like. The student will re-enters the Activity at the point where they left off. All testing features, such as timers and forward only will still apply. Once the test taker completes the Assignment, they will not be able to resume. Behavior of Assignments set to Allow Examinee to Resume
Display Examinee Info - Check to display the examinee’s username in the top right of the OWL Tester interface.
AI Proctoring - This setting is used with OWL’s AI Proctoring feature.
Monitoring - Check this box for session webcam monitoring. Images are taken at random approximately every 60 seconds.
ID Snapshot - Required the examinee to take a picture of their identification before the test can begin.
Face Snapshot - The examinee will be required to take a picture of their face before they can start the test.
Finalize ASAP - The OWL TMS will automatically finalize a response when there are no assessment requests remaining.
Primary Blind Assessment Count - Set the count of assessment requests that will be put into the blind pool for each response. The Assignment to be rated without any of the student/candidate's personal information being made available to the rater.
Secondary Blind Assessment % - Set the percentage of the responses that will be presented to the Secondary Rater for a blind assessment.
Processor - Determine how the raters' assessments should be combined to create a final score.
Standard- The score from the most recent eligible rating is used.
Average-The final score will be calculated by averaging the scores of all eligible ratings.
SPEAK (Speaking Proficiency English Assessment Kit) For users delivering SPEAK test using the OWL TMS
Other Custom Processing Algorithms - The ability to add hard-coded finalization algorithms for user-specific applications is available as a premium feature.
Certificate - This field is used with the OWL Certificates feature. Select a certificates list from the drop down.
Self Registration - Create a registration hyperlink for the assignment. NOTE: The preferred method of creating Assignment Registration Codes is through Self Registration.
SEB Key Verification - Check the SEB Key Verification box to require your specific Safe Exam Browser settings to be used when launching this assignment. The test taker will need to launch SEB from a file that you provide to them.
SEB Keys - Enter the SEB keys that you create with your SEB Administrator Account here.
Test Progress Monitor
The Test Progress Monitor displays all open/active testing sessions in a domain.
The page refreshes and updates 60 seconds.
When an examinee launches an assignment, a session row will immediately appear in the test monitor to reserve the examinee's test slot.
The progress fields will remain blank until the test taker clicks the Start Test button
Sessions remain active until either:
Student reaches the end of the test and selects confirm, or
Assignment is manually closed by using the Accept or Reset commands
System Administrators - See all activity in the domain
Instructors have access to this feature if:
They are the assignment creator.
They are added to the assignment as a proctor or test administrator.
Proctors or Test Administrators on the Assignment's roster can use this feature
Page Commands
Accept Response - The test session is closed and the assignment is ready to rate. Any unanswered questions will be marked as incomplete or given a zero.
Reset Response - All questions are cleared, the examinee’s test record is deleted and they can retake the assignment from the beginning.
Enable Resume - This will allow you to override an assignment that is set to not allow an examinee to resume testing. The user will be allowed to continue to the test, and they will begin again at the same point where they had left.
Disable Resume - This feature is used turn off the assignment’s resume feature. If the user exits the assignment before completing it, they will not be permitted to return and finish at a later time.
Field Definitions
Session Tracking # - Unique system-generated number to identify the testing session in the OWL TMS. This number is automatically assigned.
Assignment - Name of the Assignment being completed by this particular respondent. (The Test Progress Monitor allows you to track more than one assignment at a time.)
Examinee - Last name, first name of the student who opened the Assignment
Started - Shows the date and time when the Assignment was opened by the examinee. This field will turn red if the Assignment has been open for more than an hour.
Test Items Completed - Shows item progress out of the total test items. (Total is all items in all sections combined).
Current Section - Shows section progress out of total test sections.
Current Item - Shows item progress within the current section (Total is the number of items in the section).
Examinee Resume Enabled - Yes/No - Indicates whether an assignment has the Resume feature enabled. When an assignment is set to Enable Resume, the examinee is allowed to continue a closed or incomplete assignment at the same point that they had exited.
Single Resume Enabled - Yes/No - This field indicates (with a value of "Yes”) that you have used the Test Monitoring control Enable Resume for this particular assignment, overriding the assignment’s setting. The default value is "No"
IP Address - Shows the Location/Computer on which the Assignment was opened.
Examinee Username - The OWL Username of the examinee who is completing the response.
Examinee Tracking# - Unique number to identify the test taker in the OWL TMS.
Assignment Tracking# - System-generated number to identify the OWL Assignment.
Response Tracking# - System-generated number to identify the specific test response.
Slot Tracking# - OWL-generated number to identify the testing slot.
Automatic Notifications
Emails, triggered by OWL system events, are automatically sent to users.
Recipients must have an OWL user account
Recipients must have an active primary e-mail address in the system
First, a Message Template must be created for the notification
OWL is not an email management tool. As with all email, those emails triggered by OWL automatic notifications feature are sent on a best-effort basis. While most messages are successfully delivered using this add-on feature, we are not able to guarantee the delivery or receipt of a specific message.
Notification
Triggering Events
Trigger
Activity Assigned
Description
Owner adds individuals or a class to the assignment
Examinee uses a Self Registration code
Recipient
Examinee
Owner, Admins
Response Ready to Rate
Examinee responds to an activity and the OWL has performed processing on the response (e.g., auto scoring)
Use this option for Assignments with Blind Rating > 1
Owner, Admin, Raters
Rating Requested
Owner/Admin uses the Assessment Monitor Page to request a specific rater perform an assessment [Named Rater]
Rater
Rating Completed
A human rater commits an assessment from the rater module
Owner, Admins
Rating Finalized
OWL automatically finalizes responses with only auto scored items, or Owner/Admin finalizes using Assessment List Page
Owner, Admins, Examinee
Rating Published
Owner/Admin publishes finalized response using Assessment List Page
Examinee
Assignment Linking Help
Create an Assessment Path based on Test Taker Performance.
Assignment Linking is a premium feature that allows you to link two or more OWL Assignments together.
Link can be the same for all test takers (i.e., default)
Linking can be based on student performance.
If assignment linking is used. The assignment will be forced to “show instant test results”
See this FAQ about coordinating Assignment Linking and Dynamic Feedback.
If you would like this feature to be added to your OWL Subscription, please contact your OWL Support Team.
If you are not sure if you should use linking? Try this resource for selection the right type of Finish Test Feedback.
Self Registration Help
Self Registration lets System Administrators create codes or links for users to access OWL.
Self Registration is a function available to System Administrators to:
Allow New Users to Setup Their Own Accounts
Put Existing or New Users into Assignment(s)
Place Existing or New Users into Class(es)
Self-Registration
Field Definitions
Name - Give the registration a name so that you can find it in the OWL list page.
Description - The description is shown to the user when they click on the link.
Sync ID - This unique ID can be user defined, or OWL will create a random id.
Enabled - The registration is automatically enabled. If you wish to disable the registration, and prevent distributed codes from being used, uncheck this box.
Eligible Accounts - Defines who can use this registration.
Existing - The person must already have an OWL account to use the code to register for a new class or assignment.
New - This registration can only be used for people who do not already have an OWL account. They will be asked to set up an account first upon using the code.
Any - New or Existing users are able to use the code.
Activation
Auto - New account becomes active automatically, trusting that the new user has provided you with accurate information.
Email -Validates the new user’s email address. The OWL account will not become active until the user clicks on a link that is sent to them in an email to the address that they have provided.
ID Field - This control will expose the Id Field on the account setup window. Users who employ the ID field for integration, should click "require" here.
Hide
Show
Require
Targets
Domain -If you are responsible for more than one domain, select the relevant domain.
Assignment - Code will be used to put user on the roster of a specific assignment.
Class - Code will be used to put the user into a specific class.
Roles - Student, Proctor, Rater, Test Admin
Webcam Monitor Help
Confirm the test taker's identity before an during testing with OWL Webcam Monitoring.
The webcam monitor allows you to capture any of the following:
Snapshot of Examinee Face
Snapshot of Identification
Random Captures of Examinee throughout the Testing Session
When your test taker launches an assignment that includes the webcam monitor, their device MUST have a webcam in order for them to proceed. Please be sure to include this information in the pre-exam instructions you provide.
Safe Exam Browser Help
Require your students to use SEB to launch their assignment.
Test Takers must have the Safe Exam Browser (SEB) Installed on their computer
Test Takers must use the SEB file that you create to launch OWL and Begin their Assignment.
AI Proctoring Help
This is a premium feature that can be added to OWL subscriptions
AI Proctoring and Webcam Monitoring cannot be used simultaneously.
Adding AI Proctoring to Assignments
Go to the Testing Menu
Select Manage Assignments
Create or Edit an assignment
Select the checkbox for AI Proctoring

Where to View Results
Go to the Assessment Menu
Select Proctoring Sessions
View credibility metrics from the List Page
Click on the View Session icon (circle i) to see an individual's webcam footage and screen sharing

Tips for your Test Takers
There is a proctor monitoring circle in the bottom left of the screen.
Be sure that your face is not obscured and well-lit.
Limit light sources behind or on the side of the camera.
Make sure that your face stays in front of the camera during the entire process.
The browser window should be extended to the entire screen.
PLEASE NOTE: The proctoring circle can be moved to another location on your screen if it obscures your online exam.
Sets & Connectors Help
Used to link groups of users and groups of assignments.
This is an advanced feature and is only available to enterprise-level users.
The following types of connectors are available:
Assignment Rater
Assignment Test Admin
Assignment Proctor
Assignment Results Viewer
The type of Connector (rater, test admin, proctor) must match the type of the users in the Set for the Connector to work.
Step One:
Create User Set
Go to the Testing Menu >> Sets & Connectors
Select User Set
Click Create
Give it a unique name
We recommend including the following naming convention "Project Name + User Type"Click Save
Click on the Membership Icon (people)
Add users to the set

Step Two:
Create an Assignment Set
Go to the Testing Menu >> Sets & Connectors
Select Assignment Set
Click Create
Give it a unique name
We recommend using the following naming convention "Project Name + Assignments"Click Save
Click on the Membership Icon (clipboard)
Add assignments to the set

Step Three:
Create a Connector
Go to the Testing Menu >> Sets & Connectors
Select Connectors
Click Create
Give it a unique name
We recommend using the following naming convention "Project Name + Assignment + Role + Connector"Select the Connector Type
Select the User Set (from Step 1)
Select the Assignment Set (from Step 2)
For Rater Connectors, indicate the Rater Type (primary, secondary, both) and Final Rater status
Click Save

Using Assignment Rosters w/ Connectors
A single user may be connected to an assignment in multiple ways. You can see the different ways a user is on an Assignment by going to the Assignment Roster.

Go to Testing Menu >> Manage Assignments
Click on the appropriate Roster
On the roster side (left) there are columns indicating the manner of the user's enrollment: Roster Enrollment and Set Enrollment
To completely remove a user from a roster, that user must be removed from any roster enrollments and all Set memberships
Set Enrollment will remain "True" until the user is removed from all Sets with Connectors to the given assignment.
If you remove a user from one set, any other connections to the assignment remain.
Good to Know
This is an advanced feature, and is only available to enterprise-level users who have purchased this capability. Access to Sets can be turned on for a specific System Administrator in a given domain.
To connect a Set of users to one assignment, you must put that one assignment into it's own Assignment Set, or perform the task manually from the appropriate Assignment Roster.
You cannot Delete a Set that is part of a Connector
Immediate vs Delayed Operations - When you create/edit/delete a set/connector or update set membership, the status of the set/connector may show as pending. In this case the operation will be handled by a service, usually within 30 seconds. If the operation does not require syncing, it will be executed immediately.
FAQs
What is the behavior for Assignments set to "Allow Resume"?
Upon resume, test takers will need to perform another device check.
Test taker will be put into the test on the item they were on when they exited.
Test and/or Section Timers will resume with the amount of time that was remaining when the test taker exited.
Any prompts will replay.
Think timer on the individual item will be reset..
Response timer on the individual item will be reset to the full amount..
What is the order of assignments on the examinee’s Current Assignment page?
Begin Date - If the current date is prior to the assignment's begin date, the assignment will NOT appear on the Current Assignments list.
Ready Status - Assignments that have an "Activity Ready" status appear at the top of the List.
Assignments are further sorted according to their deadline with the sooner deadlines at the top of the list.
Completed (or unavailable) Status - Assignments that can no longer be started appear at the bottom of the List.
Unavailable Assignments are also further ordered according to their deadline.
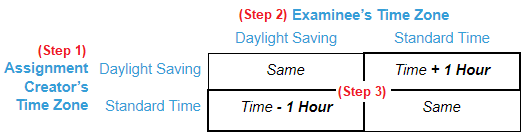
How do I adjust for Daylight Saving Time?
If you are creating your assignments in summer for the Fall or Winter terms, you may need to make an accommodation for daylight saving time changes. The same is true in the other direction as well. You can do this in three simple steps using the table below:
Step 1: Find the row that represents your current time zone.
Step 2: Find the column that represents your time zone when the assignment begins.
Step 3: Determine the adjustment from the intersecting cell in the table.
Why Did My Test Taker See This Message: “No testing slots available. Please try again in a few minutes”?
If your subscription limits the number of concurrent tests, and that threshold has been met, the next user who attempts to launch an activity will see this message.
Concurrent test slots are the number of open testing sessions for a domain at a given point in time. In this way we can provide a more efficient and cost-effective test management experience. For that reason, some OWL subscriptions limit the number of open test sessions at one time.
I removed a class from my Assignment, why are the students still on the Assignment’s Roster?
Removing a class from an assignment will NOT automatically remove those students from that assignment’s roster.
Once the students are on the roster of an assignment, they must be removed from the assignment roster directly by:
Clicking on the Students Roster of the Assignment
Selecting the student(s) from the left panel using the check box(es)
Clicking on the Add/Remove button
Why Does A Test Session Remain Open?
If a test taker closes their browser before test completion and does not return to finish, we refer to this as an abandoned test session. The test slot remains open occupying one of your allotted concurrent test slots.
If an open test session should be closed you can either "accept" or "reset" from the OWL Progress Monitor
Why is Self-Registration no working?
See this detailed self-registration troubleshooting.
My Test has a Dynamic Feedback and an Assignment link. What will the student see?
Answer: If you are linking to another assignment, you should Use Assignment Linking. There is NO need for a Dynamic Feedback. If there is a pre-existing Dynamic Feedback on your Linked Assignment, the following will display:
If there is no “default text” provided in the Assignment Link Editor, then the Dynamic Feedback Text will Display.
If there is no Dynamic Feedback, then the system generated message will display. (NOTE: this will show the examinee’s results because all linked assignments are automatically scored (even if no thresholds are provided.)